Database management-issue 252 deep introduction of multi-master and Multi-Active database technology-Cantian storage engine (II)(20241017)
author: fat head Fish Tank (Yin Haiwen)
Oracle ACE Pro: Database(Oracle and MySQL)
PostgreSQL ACE Partner
10 years of experience in the database industry, now mainly engaged in database services
with OCM 11g/12c/19c, MySQL 8.0 OCP, Exadata, CDP and other certifications
MVP of motianlun, star of mojili of the year, ITPUB certified expert, member of expert group of 100, OCM lecturer, technical consultant of PolarDB open source community, external technical consultant of HaloDB, member of OceanBase observer mission, technical Adviser, MOP technical community of youth society (youth database learning Mutual Aid Association)
the circle has the titles of "director", "security guard", "the biggest enemy of domestic database" and so on. It is not a famous social terrorist (social terrorist)
public number: fish tank of fat head fish; CSDN: fish tank of fat head fish (Yin Haiwen); Mo Tianlun: fish tank of fat head fish; ITPUB:yhw1809.
Except for authorized reprinting and indicating the source, all are "illegal" plagiarism.

This topic describes how to deploy the Cantian storage engine.
1 deployment planning
this deployment uses the latest Cantian 24.06. The Deployment architecture is as follows:
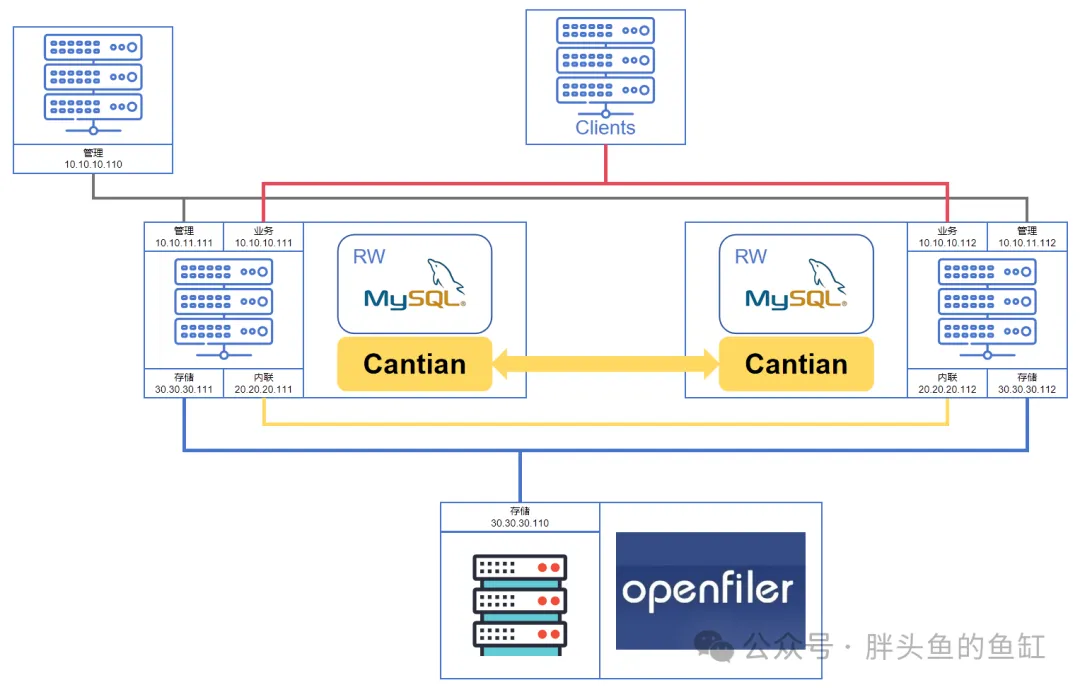
the server configuration is as follows:

the configuration of the shared disk is as follows:
use nfs to share data.

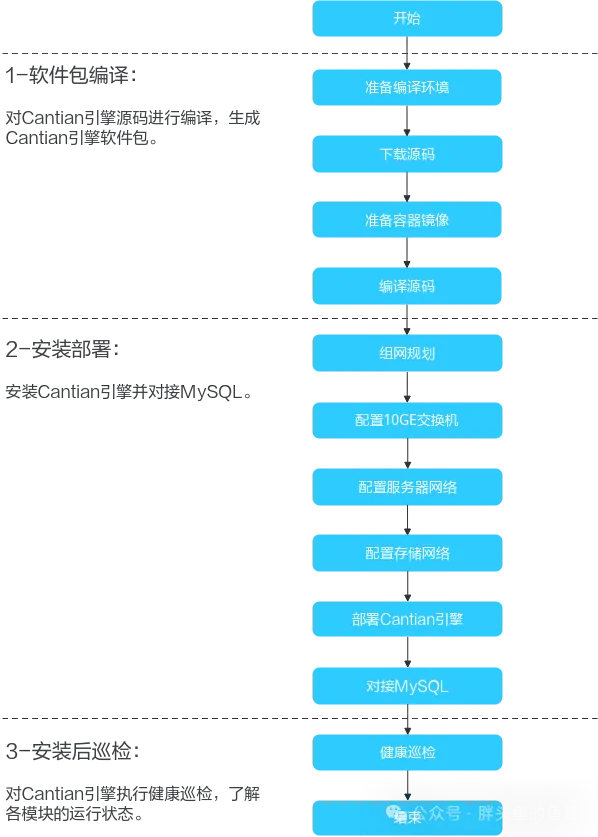
Cantian Deployment flowchart:
2. Basic server configuration
the following configurations must be performed on all servers:
2.1 configure HOSTS
cat >> /etc/hosts << EOF 10.10.10.111 ct01 10.10.10.112 ct02 10.10.11.110 mgr 10.10.11.111 ct01-mgr 10.10.11.112 ct02-mgr 20.20.20.111 ct01-priv 20.20.20.112 ct02-priv 30.30.30.113 ctst 30.30.30.111 ct01-san 30.30.30.112 ct02-san EOF
2.2 close the firewall
systemctl stop firewalld.service systemctl disable firewalld.service
2.3 disable SELinux
sed -i 's/^SELINUX=enforcing$/SELINUX=disabled /'/etc/selinux/config setenforce 0
2.4 configure the yum source
rm -rf /etc/yum.repos.d/* wget -O /etc/yum.repos.d/CentOS-Base.repo https://mirrors.aliyun.com/repo/Centos-8.repo dnf clean all dnf repolist
3 compile server configuration
the server used for compilation can be mgr or ct01/ct02. The mgr server is not deployed due to resource problems. The compilation operation is performed on ct01. in actual production, we recommend that you use a separate server. Some of these operations must be performed on all servers.
3.1 install git
# git version> = 2.18.0 is required. dnf --showduplicates list git # Check the git version in the repository, which is 2.27.0 to meet the requirements. dnf -y install git
3.2 install docker
# docker version> = 19.03 is required. #1. Load the br_netfilter kernel modprobe br_netfilter cat << EOF | sudo tee /etc/modules-load.d/netfilter.conf br_netfilter EOF lsmod |grep br_netfilter #2. Configure sysctl cat >> /etc/sysctl.conf << EOF net.ipv4.ip_forward = 1 net.ipv4.conf.all.proxy_arp = 1 net.bridge.bridge-nf-call-ip6tables = 1 net.bridge.bridge-nf-call-iptables = 1 net.netfilter.nf_conntrack_max=2310720 vm.swappiness = 0 net.ipv6.conf.all.disable_ipv6 = 1 net.ipv6.conf.default.disable_ipv6 = 1 net.ipv6.conf.lo.disable_ipv6 = 1 EOF sysctl -p #3. Configure the docker yum source dnf install -y yum-utils dnf-utils dnf config-manager --add-repo=https://mirrors.aliyun.com/docker-ce/linux/centos/docker-ce.repo dnf --showduplicates list docker-ce # Check the docker version in the repository. The minimum version is 19.03.13 to meet the requirements. #4. Install docker-ce dnf -y install docker-ce docker-ce-cli containerd.io docker-buildx-plugin docker-compose-plugin --allowerasing #5. Configure docker startup systemctl enable--now docker #6. Check the docker version docker --version [root@ct01 ~] # docker --version Docker version 26.1.3, build b72abbb
3.3 install container dependent software
# The version requires cmake 3.14.1,automake 1.16.1,libtool 2.4.6,g 8.5.0,pkgconfig 0.29.1-3,rpm-build 4.14.3. The software versions in the repository all meet the requirements. dnf -y install cmake automake libaio-devel pkgconf-pkg-config rpm-build libtool gcc-c --allowerasing
4. Configure shared storage servers
NFS is used to implement storage sharing.
4.1 install NFS
dnf install nfs-utils
4.2 create a Mount Directory
mkdir /ctst mkdir /ctst/dbstore mkdir /ctst/metadata mkdir /ctst/share mkdir /ctst/archive
4.3 process and mount disks
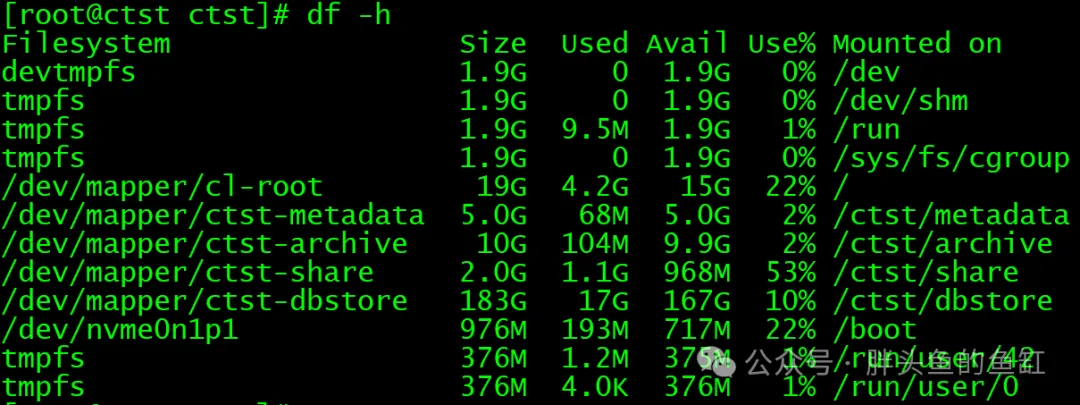
here, a 200g disk is used for demonstration:
pvcreate /dev/nvme0n2 vgcreate ctst /dev/nvme0n2 lvcreate -L 150G -n dbstore ctst lvcreate -L 5G -n metadata ctst lvcreate -L 2G -n share ctst lvcreate -L 10G -n archive ctst mkfs.xfs /dev/mapper/ctst-archive mkfs.xfs /dev/mapper/ctst-dbstore mkfs.xfs /dev/mapper/ctst-metadata mkfs.xfs /dev/mapper/ctst-share cat >> /etc/fstab << EOF /dev/mapper/ctst- dbstore/ctst/dbstore xfs defaults 0 0 /dev/mapper/ctst- metadata/ctst/metadata xfs defaults 0 0 /dev/mapper/ctst- share/ctst/share xfs defaults 0 0 /dev/mapper/ctst- archive/ctst/archive xfs defaults 0 0 EOF mount /ctst/dbstore mount /ctst/metadata mount /ctst/share mount /ctst/archive
4.4 configure NFS
cat >> /etc/exports << EOF /ctst 30.30.30.0/24(rw,sync,no_subtree_check,crossmnt,fsid=0,no_root_squash) /ctst/dbstore 30.30.30.0/24(rw,sync,no_subtree_check,no_root_squash) /ctst/metadata 30.30.30.0/24(rw,sync,no_subtree_check,no_root_squash) /ctst/share 30.30.30.0/24(rw,sync,no_subtree_check,no_root_squash) /ctst/archive 30.30.30.0/24(rw,sync,no_subtree_check,no_root_squash) EOF
configuration description: The fsid = 0 configuration in the first row can be mounted with/ctst as the root directory. Enter only the name of the secondary directory in this directory.
4.5 start NFS
systemctl start nfs-server systemctl enable nfs-server

note: You do not need to mount disks on ct01 and ct02.
5 compile Cantian
5.1 download source code
mkdir /ctdb/cantian_compile cd/ctdb/cantian_compile git clone-b cantian24.6 https://gitee.com/openeuler/cantian.git git clone-b cantian24.6 https://gitee.com/openeuler/cantian-connector-mysql.git
5.2 download MySQL source code package
cd/ctdb/cantian_compile/cantian-connector-mysql # Copy the 8.0.26 source code package mysql-server-mysql-8.0.26.tar.gz to this directory tar -zxf mysql-server-mysql-8.0.26.tar.gz mv mysql-server-mysql-8.0.26 mysql-source
5.3 Add image repository acceleration
cat > /etc/docker/daemon.json << EOF { "registry-mirrors": [ "https://dockerpull.com", "https://hub.uuuadc.top", "https://docker.anyhub.us.kg", "https://dockerhub.jobcher.com", "https://dockerhub.icu", "https://docker.ckyl.me", "https://docker.awsl9527.cn", "https://y8y6vosv.mirror.aliyuncs.com", "https://registry.dockercn.com", "https://docker.mirrors.ustc.edu.cn", "https://dockerhub.azk8s.cn", "http://hubmirror.c.163.com" ] } EOF systemctl reload-daemon systelctl restart docker
5.4 build an image
cd/ctdb/cantian_compile/cantian/docker # You need to adjust the Dockfile content first. vim ./Dockfile # RUN wget -- progress = bar:force -O /tmp/libasan5-8.2.1-3.el7.x86_64.rpm http://mirror.centos.org/centos/7/sclo/x86_64/rh/Packages/l/libasan5-8.2.1-3.el7.x86_64.rpm# The original content. The corresponding rpm Package address has expired. RUN wget --progress=bar:force -O /tmp/libasan5-8.2.1-3.el7.x86_64.rpm https://vault.centos.org/7.9.2009/sclo/x86_64/rh/Packages/l/libasan5-8.2.1-3.el7.x86_64.rpm docker build -t cantian_dev:latest -f Dockerfile . docker images

5.5 compile source code
#1. Start the container cd/ctdb/cantian_compile/cantian/dockersh container.sh dev # Enter the container
#2. Enter the compilation script Directory cd/home/regress/CantianKernel/build
#3. Generate the Cantian engine software package sh build_cantian.sh release

#4. Check the generated file ls /tmp/cantian_output

5.6 close the container
docker ps docker stop [CONTAINER ID]

# (Optional) clean up image and cache docker images docker rmi [IMAGE ID] docker system prune
6 deploy Cantian
6.1 check CPU support
cat /proc/cpuinfo | grep -o constant_tsc | uniq

the content to be returned is constant_tsc to ensure the time accuracy of the database server.
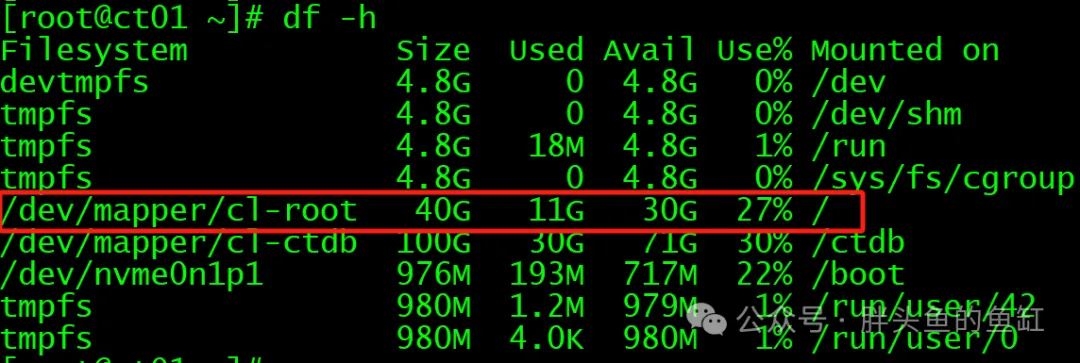
6.2 root directory check
这里需要确认根目录至少有20gb剩余空间。
6.3 Python检查
Python版本需>= 3.6.0。

检查pyopenssl,密码学是否安装
pip3显示密码pip3显示pyopenssl# 如未安装执行以下命令安装pip3安装pyopenssl -- trusted-hos t=mirrors.huaweicloud.com-我 https://mirrors.huaweicloud.com/repository/pypi/simple/ pip3安装密码学 -- trusted-hos t=mirrors.huaweicloud.com-我 https://mirrors.huaweicloud.com/repository/pypi/simple/

6.4检查/dev/shm权限
/dev/shm目录权限需要为drwxrwxrwt
ll -d /dev/shm# 如权限未正确,执行chmod 777 /dev/shm

6.5调整系统配置
cat >> /etc/sysctl.conf <<EOF kernel.shmmax = 23192823399 EOFsysctl -p
6.6创建用户
用户add-m-u 5000 -d /home/ctdba ctdba
6.7创建安装目录
mkdir /ctdb/cantian_install chmod 755 /ctdb/cantian_install chown ctdba:ctdba /ctdb/cantian_install光盘/ctdb/cantian_install mv /path/to/Cantian_24.06_x86_64_RELEASE.tgz ./ tar -zxvf Cantian_24.06_x86_64_RELEASE.tgz
Cantian6.8修改配置文件
修改配置文件/ctdb/cantian_install/cantian_connector/action/config_params_file.json
{"deploy_mode":"nas","deploy_user":"ctdba:ctdba","node_id":"0","cms_ip":"20.20.20.111;20.20.20.112","storage_dbstore_fs":"dbstore","storage_share_fs":"共享","storage_archive_fs":"存档","storage_metadata_fs":"元数据","cantian_in_container":"0","mysql_in_container":"0","share_logic_ip":"30.30.30.113","archive_logic_ip":"30.30.30.113","metadata_logic_ip":"30.30.30.113","storage_logic_ip":"30.30.30.113","db_type":"1","mes_ssl_switch":false,"mysql_metadata_in_cantian":false,"MAX_ARCH_FILES_SIZE":"512","ca_path":"","crt_path":"","key_path":"","redo_num":"3","redo_size":"1G"}
附:配置文件说明
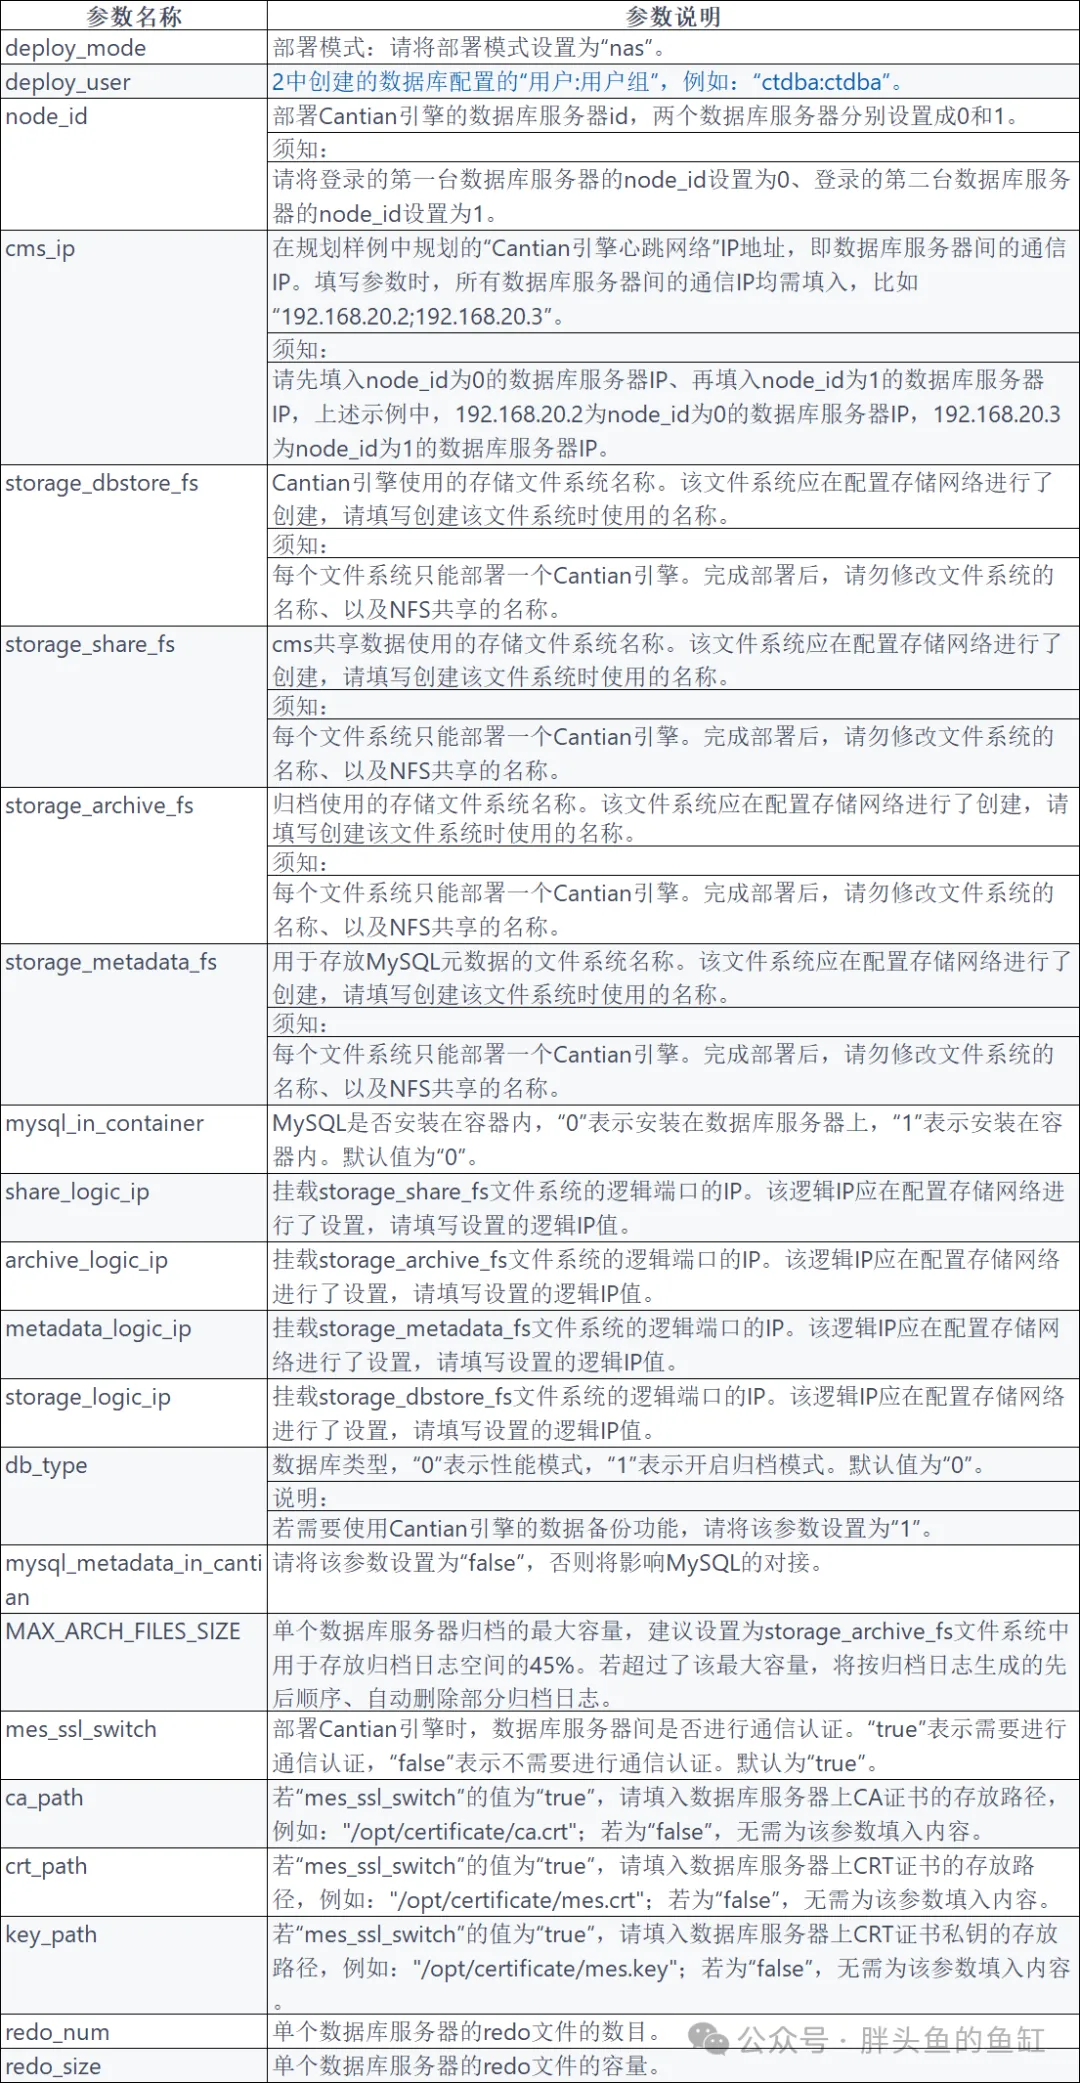
6.9调整其他配置参数
在/ctdb/cantian_install/cantian_connector/action/cantian/ install_config.json配置中添加以下内容:
"Z_KERNEL_PARAMETER3":"TEMP_BUFFER_SIZE = 1G","Z_KERNEL_PARAMETER4":"TEMP_POOL_NUM = 4","Z_KERNEL_PARAMETER5":"BUF_POOL_NUM = 16","Z_KERNEL_PARAMETER6":"LARGE_POOL_SIZE = 256M","Z_KERNEL_PARAMETER7":"DATA_BUFFER_SIZE = 8G","Z_KERNEL_PARAMETER8":"SHARED_POOL_SIZE = 512M","Z_KERNEL_PARAMETER9":"会话 = 512"
注:因为测试环境内存不足,需要调整MySQL相关内存参数。
6.10部署Cantian
sh /ctdb/cantian_install/cantian_connector/action/appctl.sh install /ctdb/cantian_install/cantian_connector/action/config_params_file.json
这里在操作过程中出现了点小插曲、输出的检查日志的路径和实际的路径位置不一致:

设置cantiani管理员密码:

密码:Cantian_123

6.11节点2部署
在ct02节点重复6.5-6。10操作内容,注意配置文件 “node_id”: “1”。
注:如部署过程中(未完成)因为各种原因重启服务器后,需要执行以下命令启动自动挂载
systemctl启动悬臂
该服务自动挂载后续安装完成后将由服务cantian.timer接管
注:部署过程中会对操作系统相关配置进行调整,并创建用户cantian,用于运行Cantian存储引擎以及MySQL
6.12启动cantiani
在两个节点上分别执行以下命令:
sh /opt/cantian/action/appctl.sh开始
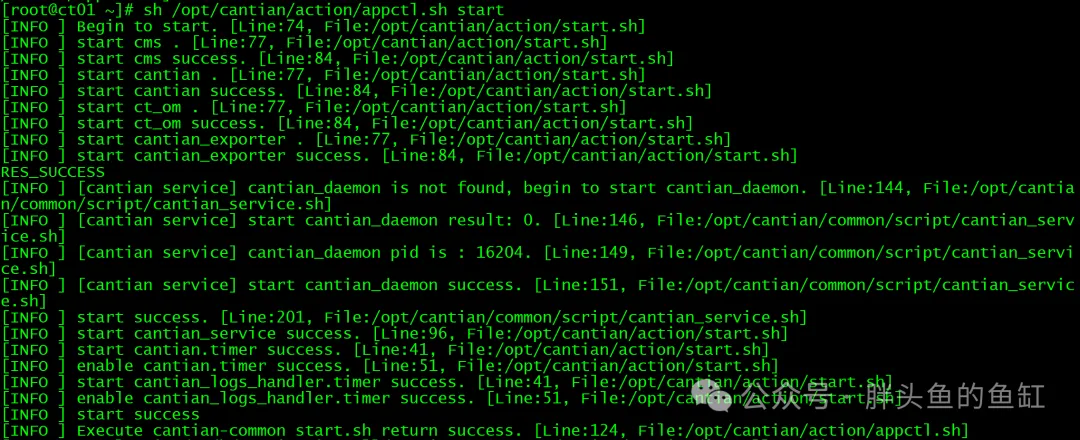
Cantian6.13检查状态
systemctl status cantian.timer systemctl status cantian_logs_handler.timer su -s /bin/bash - cantian cms统计


注:如安装失败需要重新调整配置并部署,步骤如下:
1.关闭悬臂
sh /opt/cantian/action/appctl.sh stop
2.卸载悬臂
sh /opt/cantian/action/appctl.sh卸载覆盖
3.删除无效文件
# 所有计算节点
rm -rf /mnt/dbdata/本地/*
# 存储节点
rm -rf /ctst/dbstore/*
rm -rf /ctst/metadata/*
rm-射频/ctst/共享/*
rm -rf /ctst/archive/*
4.重新部署
在所有调整完成后重新部署悬臂
7配置MySQL
7.1下载并上传MySQL源码包
这里需要注意,需要使用和前面编译过程中一样的8.0。26版本,需要使用编译安装,否则在后续加载坎蒂安相关插件过程中会出现异常。
mysql-server-mysql-8.0.26.tar.gz
7.2安装依赖软件
dnf -y安装libncurses * ncurses ncurses-devel bison libarchive openssl-devel libtirpc-devel rpm -ivh rpcgen-1.3.1-4.el8.x86_64.rpm
7.3创建MySQL软件目录并解压软件
mkdir /ctdb/mysql mkdir /ctdb/mysql/base mkdir /ctdb/mysql/boost chown cantian:cantian /ctdb/mysql -R cp /path/to/mysql-server-mysql-8.0.26.tar.gz /ctdb/mysql su-s/bin/bash - cantian光盘/ctdb/mysql tar -xvf mysql-server-mysql-8.0.26.tar.gz mv mysql-server-mysql-8.0.26/ mysql_source/
7.4编译MySQL
光盘/ctdb/mysql/mysql_source/ cmake -DCMAKE_INSTALL_PREFIX =/ctdb/mysql/base -DBUILD_CONFIG = mysql_release -DWITH_UNIT_TESTS = 0 -DDOWNLOAD_BOOST = 1 -DCMAKE_C_COMPILER =/usr/bin/gcc -DCMAKE_CXX_COMPILER =/usr/bin/g -DFORCE_INSOURCE_BUILD = 1 -DWITH_BOOST =/ctdb/mysql/boost

制造制造安装

7.5创建其他目录
su -s /bin/bash - cantian mkdir /ctdb/mysql/var mkdir /ctdb/mysql/data mkdir /ctdb/mysql/tmp mkdir /ctdb/mysql/日志
7.6拷贝插件文件
cp /opt/cantian/mysql/server/plugin/ha_ctc.so /ctdb/mysql/base/lib/plugin/ cp /opt/cantian/image/cantian_connector/for_mysql_official/mf_connector_mount_dir/cantian_lib/libctc_proxy.so /ctdb/mysql/base/lib/plugin/ cp /opt/cantianan/image/cantian_connector/for_mysql_official/mf_connector_mount_dir/cantian_lib/libsecurec。so /ctdb/mysql/base/lib/plugin/ cp /opt/cantian/image/cantian_connector/for_mysql_official/mf_connector_mount_dir/cantian_lib/libsecurec.a /ctdb/mysql/base/lib/plugin/ cp /opt/cantian/image/cantian_connector/for_mysql_official/mf_connector_mount_dir/cantian_lib/libctc_proxy.so /usr/lib64/ cp /opt/cantian/image/cantian_connector/for_mysql_official/mf_connector_mount_dir/cantian_lib/libsecurec.so /usr/lib64/ cp /opt/cantian/image/cantian_connector/for_mysql_official/mf_connector_mount_dir/cantian_lib/libsecurec.a /usr/lib64/ chmod 755 /usr/lib64/libctc_proxy.so chmod 755 /usr/lib64/libsecurec.所以chmod 755 /usr/lib64/libsecurec。a chmod 755 /ctdb/mysql/base/lib/plugin/ha_ctc.so chmod 755 /ctdb/mysql/base/lib/plugin/libctc_proxy.so chmod 755 /ctdb/mysql/base/lib/插件/libsecurec.所以chmod 755 /ctdb/mysql/base/lib/plugin/libsecurec。一个chown -R cantian: cantian/ctdb/mysql/base/lib/plugin/ha_ctc.so chown -R cantian: cantian /ctdb/mysql/base/lib/plugin/libctc_proxy.so chown -R cantian:cantian /ctdb/mysql/base/lib/plugin/libsecurec.所以chown -R cantian:cantian /ctdb/mysql/base/lib/plugin/libsecurec。a
7.7编写配置文件
编写配置文件/etc/my.Cnf
[client] socket = /ctdb/mysql/var/mysql.sock port = 3306 [mysqld] ############# GENERAL ############# event_scheduler = ON autocommit = OFF character_set_server = UTF8MB4 collation_server = UTF8MB4_UNICODE_CI explicit_defaults_for_timestamp = ON lower_case_table_names = 1 port = 3306 read_only = OFF transaction-isolation = READ-COMMITTED interactive_timeout = 600 max_allowed_packet = 32M max_connections = 256 max_user_connections = 200 sort_buffer_size = 1M table_definition_cache = 1400 table_open_cache = 2000 table_open_cache_instances = 4 thread_cache_size = 9 thread_stack = 256K tmp_table_size = 64M max_heap_table_size = 64M check_proxy_users = ON mysql_native_password_proxy_users = ON ############# SAFETY ############## local_infile = OFF skip_name_resolve = ON sql_mode = STRICT_TRANS_TABLES,ERROR_FOR_DIVISION_BY_ZERO,NO_AUTO_VALUE_ON_ZERO,NO_ENGINE_SUBSTITUTION,NO_ZERO_DATE,NO_ZERO_IN_DATE,ONLY_FULL_GROUP_BY ############# LOGGING ############# general_log = 0 log_queries_not_using_indexes = ON log_slow_admin_statements = ON long_query_time = 10 slow_query_log = ON log_raw = ON ############# REPLICATION ############# server_id = 101010111 ############### PATH ############## basedir = /ctdb/mysql/base datadir = /ctdb/mysql/data tmpdir = /ctdb/mysql/tmp socket = /ctdb/mysql/var/mysql.sock pid_file = /ctdb/mysql/data/mysql.pid innodb_data_home_dir = /ctdb/mysql/data log_error = /ctdb/mysql/log/error.log general_log_file = /ctdb/mysql/log/general.log slow_query_log_file = /ctdb/mysql/log/slow.log [mysql] ############# CLIENT ############# max_allowed_packet = 32M socket = /ctdb/mysql/var/mysql.sock [mysqldump] max_allowed_packet = 32M
注:以下参数必须配置
check_proxy_users=ON
mysql_native_password_proxy_users=ON
log_raw= ON
注:MySQL配置的max_connections要低于Cantian部署时的"Z_KERNEL_PARAMETER9": "SESSIONS=512"配置的值(详见本文6.9),也可使用下面命令查询
su -s /bin/bash - cantian ctsql sys@127.0.0.1:1611 -q #这里需要输入Cantian部署过程中配置的管理员密码
show parameter sessions

7.8 加载插件
chmod 755 /etc/my.cnf chown -R cantian:cantian /etc/my.cnf /ctdb/mysql/base/bin/mysqld --defaults-file=/etc/my.cnf --initialize-insecure --datadir=/ctdb/mysql/data --plugin-dir=/ctdb/mysql/base/lib/plugin --early-plugin-load="ctc_ddl_rewriter=ha_ctc.so;ctc=ha_ctc.so;" --initialize-insecure --user=cantian
7.9 启动MySQL
/ctdb/mysql/base/bin/mysqld_safe --defaults-file=/etc/my.cnf --datadir=/ctdb/mysql/data --plugin-dir=/ctdb/mysql/base/lib/plugin --plugin-load="ctc_ddl_rewriter=ha_ctc.so;ctc=ha_ctc.so;" --check_proxy_users=ON --mysql_native_password_proxy_users=ON --default-storage-engine=CTC --user=cantian &

7.10 节点2部署并启动MySQL
可以将节点1的base目录直接复制到节点2对应路径,并完成本节除MySQL源码编译以外的其他内容。这里需要注意需要调整配置文件中的server_id=101010112。
8 意见和建议
在编译、部署Cantian的过程中针对Cantian 24.06有以下一些地方想吐槽的(也是意见和建议):
-
只能部署在CentOS 8.2(x86_64)和OpenEuler-22.03-LTS(aarch64)这两个指定的操作系统版本;数据库也只能使用MySQL 8.0.26。这两点造成操作系统和数据库的适配度较差,无法获得最新的更新、修复与安全相关升级。
-
编译需要依赖docker,以容器方式运行,操作复杂度略大。
-
编译过程中用了大量EL7的包,未做到良好的版本匹配,有点不解。
-
编译时间比较长,比肩部署EMCC,按小时计(这也可能是我给的CPU资源不足)。
-
git拉取源代码的时候输入版本24.6,与文档对应和编译后安装版本24.06不一致。
-
目前仅支持2个节点,希望可以支持更多节点。
-
官方文档及默认部署针对不同规格服务器的支持不是太好,需要调低部分参数才能执行。
-
MySQL也需要通过编译安装,建议在Cantian编译过程中可以直接包含对应MySQL包生成(如果有的话,请在文档中显著位置标明)。
总结
本篇文章从目录来看就比较复杂,可以说是现在最完善的Cantian存储引擎部署与MySQL对接文档,看着挺复杂实际也不简单,也希望我的意见和建议能够帮助Cantian引擎发展。
老规矩,知道写了些啥。
本文经 胖头鱼的鱼缸(尹海文) 授权转载。

 Reprint